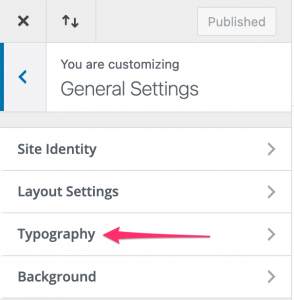
One way to set your site apart from others is through your choice of fonts. Fonts say a lot about your personality, don't they? Did you know that Divi has Google Fonts baked right in? The Divi Theme customizer makes it so easy to assign the Google fonts you want to use on your site. How do you set up the fonts? Go to Divi then Theme Customizer. Once that loads, you'll look for General Settings > Typography.
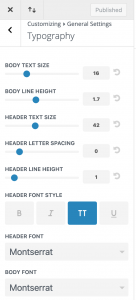
 In the typography panel, you'll see the settings for your fonts. There is one for Header font – these are used on titles of pages and for an H1, H2, H3 type headings you use within your pages and posts. There is another for Body font. The body font is used for all of the paragraph text on your site, for pages and blog posts.
You can set the font, the font weight (how bold it is), the color of links, the color of the body text, the color of the header text and the sizes, among other things.
What's nice about the customizer, is you can preview what these look like and get them just the way you want before publishing them.
 This is one of the first stops I make when setting up a new site using Divi. Why? because you set these defaults and the modules you add to your pages and layouts will use these defaults. Of course you can override them as needed, but it so many cases you can save time by using the default settings from the customizer.
A word on fonts: There are only 2 to choose from within the customizer. You can use additional fonts on your site for other elements but keep in mind that the more fonts you load, the longer your site could take to load. It can have an impact on performance. That's why I like to keep it to no more than 3 fonts, 2 is even better. Fast sites are better!
Google has hundreds of fonts, but what if you want a font that comes from somewhere else? Or a font that you own and have on your computer? Divi has an upload feature where you can upload your own font and use it within your theme. Sometimes, on some hosts, you'll try to upload a font and get a message that this filetype is not permitted for security reasons. If you see that error, the system won't allow the font to be added. But don't worry, there's a plugin for that! You can read more about that over at Elegant Themes here.
Divi Presets?
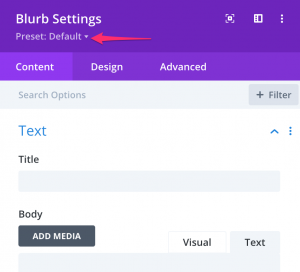 Once you've set the default fonts for your site, you'll notice that the various modules in Divi are already using these settings. But what if you want a particular module, like the Blurb module to use different settings for say the Title text? You can use Divi's Presets feature for this. Presets are saved styles for modules. Once you create a Preset you can easily use it on your modules to duplicate the same settings. It covers more than fonts, you can use it for colors, backgrounds, borders and more.
To create a preset, first get the module set up the way you want it. Then once it's looking good, you can create a preset from your module. At the top of the module, under the Title/Name of the module, you'll see Preset: Default. Click this to expand the drop down. This is where you can add a new preset.
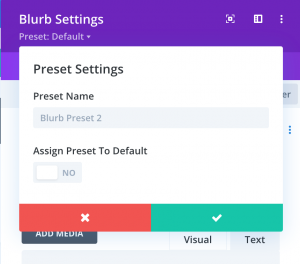 To add the new preset, click Create new preset from current styles and fill in the name of your preset. I like to name these so I remember what they are. For example: if I use a different font for the title, I'll include the name and/or size of the font. This makes it easy to re-use and know what it will look like. If you'd like to assign your new preset to the default, then check the box and then click the green checkmark to save. You've created your first Divi Preset!
Now that you've created the preset, you can save time when you add this module elsewhere on your site. You can use the preset instead of going through and resetting up the module over and over, pretty nice, huh?